latex 使用教程
1 latex基础模块
1.0 使用times new roman字体
\usepackage{txfonts}1.1 文件模板:
\documentclass{article}     此处默认全部使用英文,若要使用中文显示,需要换成:
\documentclass{ctexart}     此时就可以在文档中显示中文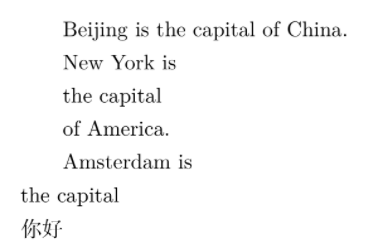
1.2 创建文章名
\title{hello word}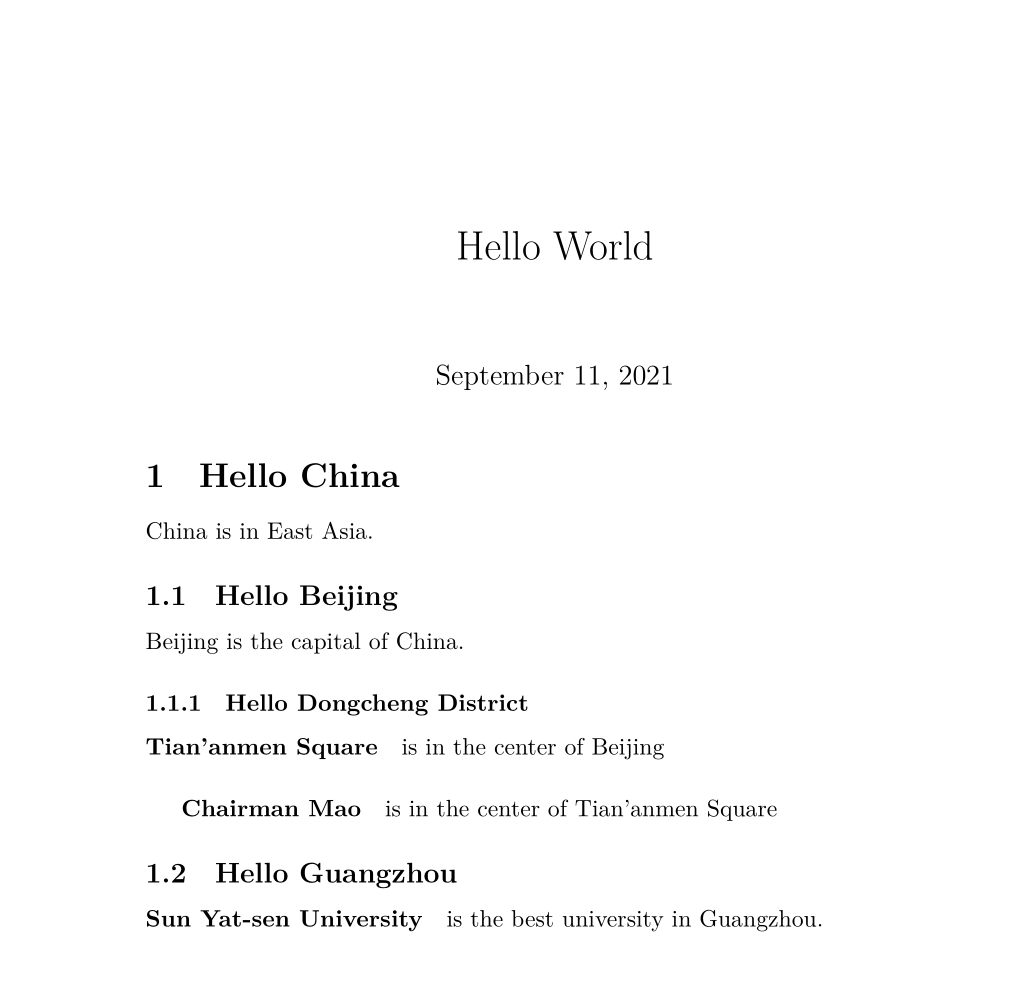
1.3 文档开头和结尾
\begin{document}
....
\end{document}1.4 显示作者信息
\maketitle Generate a title. In the standard classes the title appears on a separate page, except in the article class where it is at the top of the first page.如果没有\maketile你的author之类的信息是不会显示的
1.5 创建一级标题
\section{Hello China}1.6 创建二级标题
\subsection{Hello China}1.7 创建三级标题
\subsubsection{Hello China}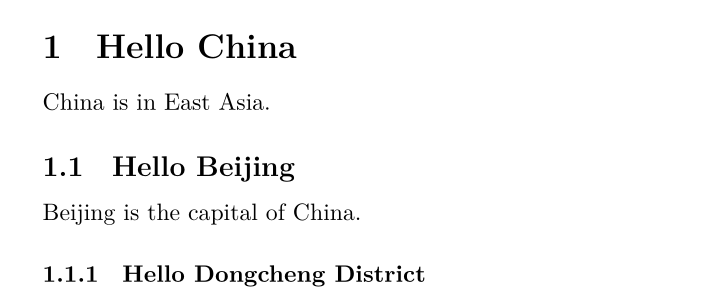
1.9 创建段落
\paragraph{Tian'anmen Square}is in the center of Beijing1.10 创建带缩进的段落
\subparagraph{Chairman Mao} is in the center of Tian'anmen Square
1.11 创建目录
\tableofcontents1.13 换行
\documentclass{article}
\begin{document}
Beijing is
the capital
of China.

New York is

the capital

of America.

Amsterdam is \\ the capital \\
of Netherlands.
\end{document}上述代码得出的结果为: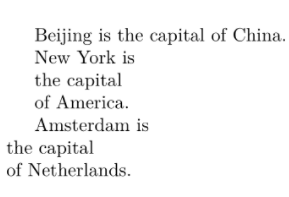
两次换行才会真的换行,单次换行没有换行的作用,表现在代码中的形式,一种是直接两次换行,或者以\\的形式强制换行
1.14 宏包
\package{ } 就是在调用宏包,对计算机实在外行的同学姑且可以理解为工具箱。 每一个宏包里都定义了一些专门的命令,通过这些命令可以实现对于一类对象(如数学公式等)的统一排版(如字号字形),或用来实现一些功能(如插入图片或制作复杂表格)。 通常在\documentclass 之后,在\begin{document} 之前,将文章所需要涉及的宏包都罗列上。 对于新人而言比较常用的宏包有
- 编辑数学公式的宏包:\usepackage{amsmath} 和 \usepackage
- 编辑数学定理和证明过程的宏包:\usepackage
- 插入图片的宏包:\usepackage
- 复杂表格的宏包:\usepackage
2 latex初级教程
2.0 插入公式需要的宏包
\usepackage{amsmath}
\usepackage{amssymb}2.1 插入公式
\documentclass{article}
\usepackage{amsmath}
\usepackage{amssymb}
\begin{document}
The Newton's second law is F=ma.

The Newton's second law is $F=ma$.

The Newton's second law is
$$F=ma$$

The Newton's second law is
\[F=ma\]

Greek Letters $\eta$ and $\mu$

Fraction $\frac{a}{b}$

Power $a^b$

Subscript $a_b$

Derivate $\frac{\partial y}{\partial t} $

Vector $\vec{n}$

Bold $\mathbf{n}$

To time differential $\dot{F}$

Matrix (lcr here means left, center or right for each column)
\[
\left[
\begin{array}{lcr}
a1 & b22 & c333 \\
d444 & e555555 & f6
\end{array}
\right]
\]

Equations(here \& is the symbol for aligning different rows)
\begin{align}
a+b&=c\\
d&=e+f+g
\end{align}

\[
\left\{
\begin{aligned}
&a+b=c\\
&d=e+f+g
\end{aligned}
\right.
\]

\end{document}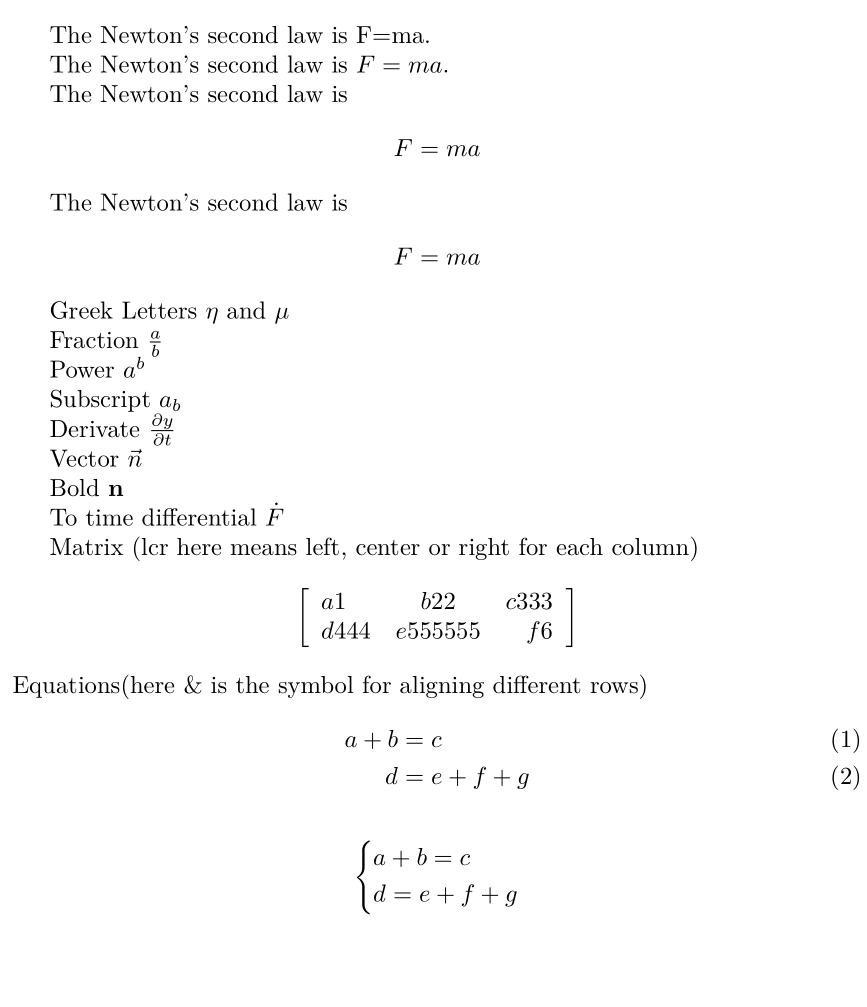
2.1.1 行内公式
$ f(x) = a+b $2.1.2 行间公式
$$ f(x) = a+b $$2.1.3 给公式手动编号
$$ f(x) = a - b \tag{1.1} $$2.1.4 简单运算
拉丁字母、阿拉伯数字和+-*/=运算符可以直接键盘输入
\cdot 表示乘法的圆点
\cdots 表示三个圆点
\neq 表示不等号
\equiv 表示恒等于
\bmod 表示取模
\quad 代表当前字体下,一个汉字的空白距离(空格)
\qquad 代表当前字体下两个汉字的空白距离 (空格)
$$ x+2-3*4/6=4/y + x\cdot y $$$$ 0 \neq 1 \quad x \equiv x \quad 1 = 9 \bmod 2 $$
2.1.5 上下标
- 语法_表示下标
- 语法^表示上标
- 语法'表示求导
- 上下标内容不止一个字符时,需要用大括号括起来
$$ a_{ij}^{2} + b^3_{2}=x^{t} + y' + x''_{12} $$2.1.6 根号、分式
\sqrt 表示平方根
\sqrt[n] 表示n次方根
\frac表示分式
latex$$\sqrt{x} + \sqrt{x^{2}+\sqrt{y}} = \sqrt[3]{k_{i}} - \frac{x}{m}$$
2.1.7 上下标记
- \overline 在表达式上画出水平线
- \underline 在表达式下画出水平线
$$\overline{x+y} \qquad \underline{a+b}$- \overbrace 在表达式上给出一个水平的大括号
- \underbrace 在表达式下给出一个水平的大括号
$$\overbrace{1+2+\cdots+n}^{n个} \qquad \underbrace{a+b+\cdots+z}_{26}$$2.1.8 向量
\vec 表示向量
\overrightarrow 表示箭头向右的向量
\overleftarrow 表示箭头向左的向量
\underrightarrow 表示箭头在下
$$\vec{a} + \overrightarrow{AB} + \overleftarrow{DE}$$2.1.9 积分、极限求和、乘积
- \infty 无穷大
- \lim 极限
- \int 积分
- 下限_
- 上限^
- \sum 求和
- \prod 表示乘积
$$ \lim_{x \to \infty} x^2_{22} - \int_{1}^{5}x\mathrm{d}x + \sum_{n=1}^{20} n^{2} = \prod_{j=1}^{3} y_{j} + \lim_{x \to -2} \frac{x-2}{x} $$2.1.10 三圆点
- \ldots 点位于基线上
- \cdots 点居中
- \vdots 点垂直
- \ddots 点对角线排列
$$ x_{1},x_{2},\ldots,x_{5} \quad x_{1} + x_{2} + \cdots + x_{n} $$2.1.11 重音符号
\hat $$ \hat{x} $$
\bar 平均值 $$ \bar{x} $$
\tilde 趋势符号 $$ \tilde{x} $$
2.1.12 矩阵表示

- matrix 没有括号
- bmatrix 有中括号的矩阵(方括号 brackets)
- vmatrix 行列式
- pmatrix 小括号括起来的矩阵 (小括号 paranthesis)
&用于分隔列 \用于分隔行
$$ \begin{matrix} 1&2&3 \cdots \ 1&2&3 \cdots \ \vdots & \vdots & \ddots\ \end{matrix} $$ 创建一个矩阵的基本语句
$$
\begin{matrix}
...
\end{matrix}
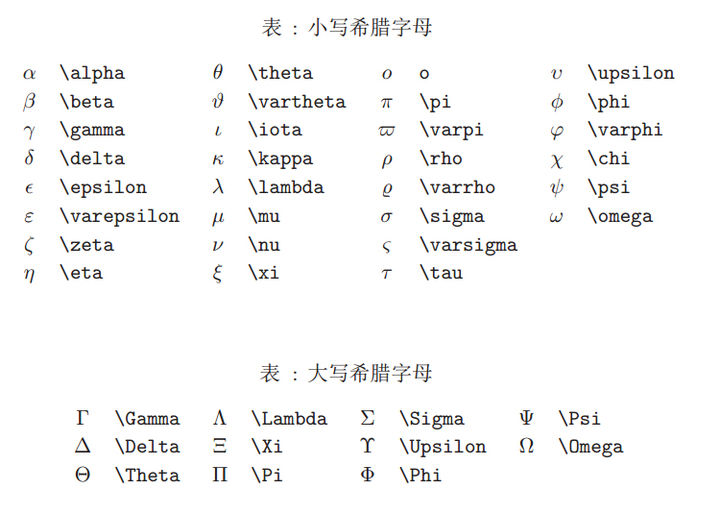
$$2.1.13 希腊字母
LateX中使用反斜杠\加上读音实现,读音首字母大写就可输入大写形式
2.1.14 公式组合
cases环境实现公式的组合
&分隔公式和条件
- latex
\lim\limits_{x \to 0} 是的x->0 位于lim的正下方
$$D(x) = \begin{cases}
\lim\limits_{x \to 0} \frac{a^x}{b+c}, & x<3 \\
\pi, & x=3 \\
\int_a^{3b}x_{ij}+e^2 \mathrm{d}x,& x>3 \\
\end{cases}$$2.1.15 公式拆分
利用split环境拆分
$$\begin{split}
\cos 2x &= \cos^2x - \sin^2x \\
&=2\cos^2x-1
\end{split}$$2.1.16 三角函数
- \cos
- \sin
- \tan

$$\cos^2(x+y)$$2.2 插入图片
xelatex编译方式可以使用png,jpg等常用图片格式,其他编译方式没有测试过!!!!
首先使用插入图片的宏包:\usepackage
随后使用以下代码插入图片:
\includegraphics[width=4.00in,height=3.00in]{1.jpg}只需要将图片复制到和.tex文件同级目录下,就可以通过文件名调用图片
2.2.1 \includegraphics
\includegraphics有两个参数,第二参数是我们的图片的名字,全称(在这里必须和我们的tex文件放在同一个路径下)。
一般我们要插入的图片是提前选好的,那么有可能就存在着和文档的规格有一些不符合的情况,这个样子的话我们就需要对图片做一些适当的调整。比如说设定图片的高度和宽度或者是按比例缩放。
latexwidth=3cm[缩放因子], height=8 cm[缩放因子] scale=0.4[缩放因子]
2.2.2 浮动体
- 一般情况下我们很少会把图片直接插入到我们的文本当中,而是会给它放置在一个叫做浮动体(float)的东西中。这样图片可以有一些相对位置的变换,不会造成分页困难等问题。
- 图片的浮动环境是figure
\begin{figure}[ht]

\centering
\includegraphics[scale=0.6]{fullscreen.png}
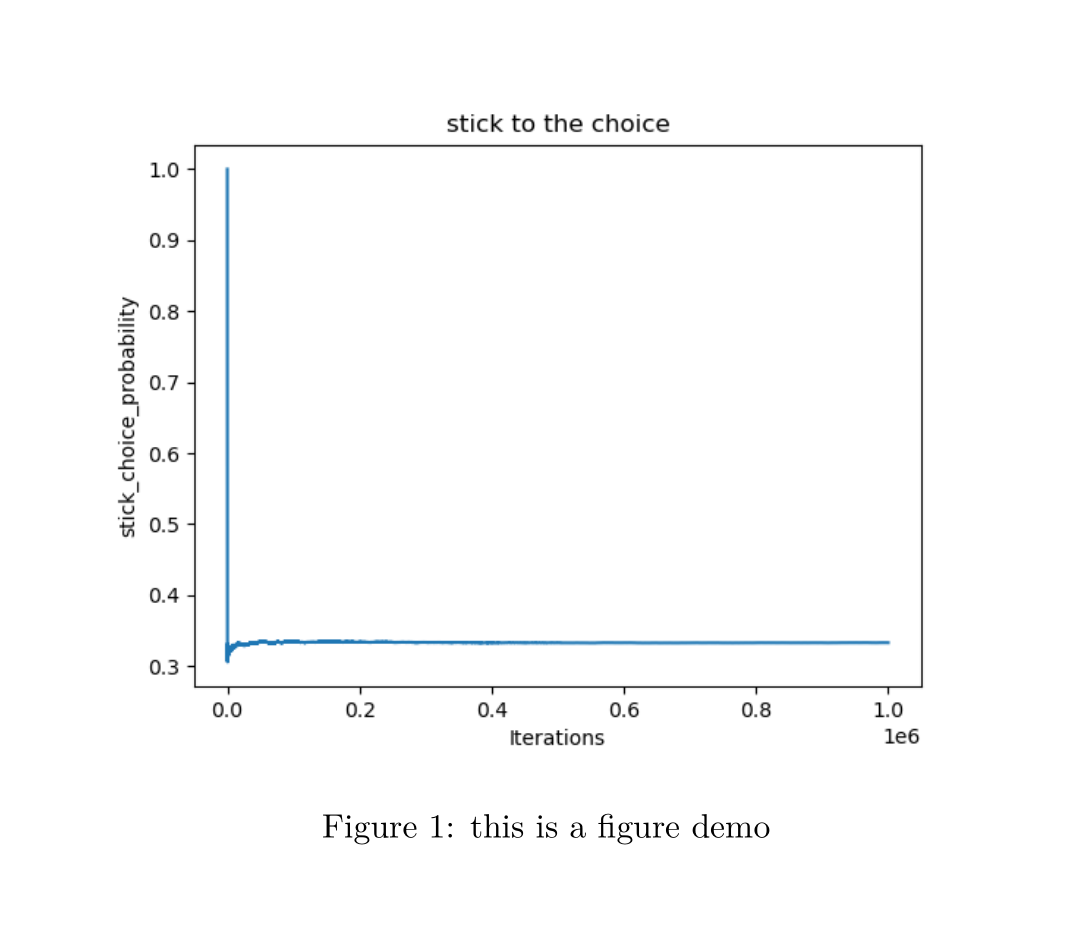
\caption{this is a figure demo}
\label{fig:label}
\end{figure}在这里第一行和最后一行就是我们使用figure的浮动体环境。 [ht]是可选项 h表示的是here在这里插入 t表示的是在页面的顶部插入
- h 此处(here)
- t 页顶(top)
- b 页底(bottom)
- p 独立一页(page)
使用figure表示的是把我们这个东西看成一个段落并且是没有任何缩进的
\centering表示的是里面紧跟的内容都居中
\includegraphics[]{}表示的插入图片
\caption设置图片的一个编号以及为图片添加标题
2.2.3 相对路径插入图片
\begin{figure}[ht]

\centering
\includegraphics[scale=0.6]{figs/droid.png}
\caption{this is a figure demo}
\label{fig:pathdemo}
\end{figure}2.2.4 绝对路径插入图片
\begin{figure}[ht]

\centering
\includegraphics[scale=0.6]{F:/LatexWS/figs/index.png}
\caption{this is a figure demo}
\label{fig:pathdemo1}
\end{figure}2.2.5 指定图片路径
\documentclass{article}

\usepackage{graphicx}
\graphicspath{{figs/}}

\begin{document}
\begin{figure}[ht]

\centering
\includegraphics[scale=0.6]{KitKat.png}
\caption{this is a figure demo}
\label{fig:pathdemo4}
\end{figure}

\end{document}2.3 插入表格
tabular环境是LaTeX默认创建表格的环境。你需要对这个环境手动指定一个参数。{c c c}参数告诉LaTeX,表格将会有三列,每一列都是居中对齐(c: center)。
tabular参数介绍:
{ |c|c|c| }这个参数设定了表格中有三列,列旁都有一个竖直的分割线。每一个c都代表这一列中的内容是居中对齐的,你也可以使用r来向右对齐,或者l来向左对齐。- \hline 会在表格中插入水平的分割线
cell1 & cell2 & cell3 \\&符号分割了单元格之间的内容。\\代表着一行的结束。
2.3.1 插入固定长度的表格
在.tex文件头部加/usepackage
\begin{center}
\begin{tabular}{ | m{5em} | m{1cm}| m{1cm} | }
\hline
cell1 dummy text dummy text dummy text& cell2 & cell3 \\
\hline
cell1 dummy text dummy text dummy text & cell5 & cell6 \\
\hline
cell7 & cell8 & cell9 \\
\hline
\end{tabular}
\end{center}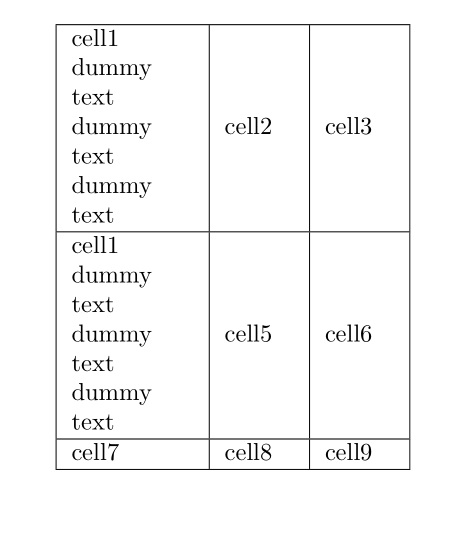
2.3.2 插入均等宽度的表格
使用tabularx包\usepackage
\begin{tabularx}{0.8\textwidth} {
  | >{\raggedright\arraybackslash}X
  | >{\centering\arraybackslash}X
  | >{\raggedleft\arraybackslash}X | }
 \hline
 item 11 & item 12 & item 13 \\
 \hline
 item 21  & item 22  & item 23  \\
\hline
\end{tabularx}
2.3.3 表格的行列合并
\begin{center}
    \begin{tabular}{ | m{5em} | m{1cm}| m{1cm} | }
    \hline
    \multicolumn{3}{|c|}{Country}\\
    \hline
    cell1& cell2 & cell3 \\
    \hline
    cell4& cell5 & cell6 \\
    \hline
    cell7 & cell8 & cell9 \\
    \hline
    \end{tabular}
    \end{center}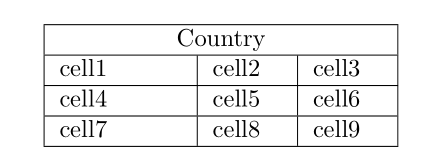
2.3.4 跨越多页的表格
引入longtable来让表格跨越多个页面
\documentclass{article}
\usepackage[utf8]{inputenc}
\usepackage{longtable}

\begin{document}

 \begin{longtable}[c]{| c | c |}
 \caption{Long table caption.\label{long}}\\

 \hline
 \multicolumn{2}{| c |}{Begin of Table}\\
 \hline
 Something & something else\\
 \hline
 \endfirsthead

 \hline
 \multicolumn{2}{|c|}{Continuation of Table \ref{long}}\\
 \hline
 Something & something else\\
 \hline
 \endhead

 \hline
 \endfoot

 \hline
 \multicolumn{2}{| c |}{End of Table}\\
 \hline\hline
 \endlastfoot

 Lots of lines & like this\\
 Lots of lines & like this\\
 Lots of lines & like this\\
 Lots of lines & like this\\
 Lots of lines & like this\\
 Lots of lines & like this\\
 Lots of lines & like this\\
 Lots of lines & like this\\
 ...
 Lots of lines & like this\\
\end{longtable}\endfirsthead这个命令之前的内容会出现在第一页中表格的头部。\endhead这个命令之前,endfirsthead命令之后的内容,会出现在除了第一页的其他页中,表格的头部。\endfoot与endhead相似。在这个命令之前,\endhead之后,内容会出现在除了最后一页的其他页中,表格的底部。\endlastfoot与endfirsthead相似。在这个命令之前,\endfoot命令之后的内容,会仅出现在最后一页表格的底部。
2.3.5 表格位置
\begin{table}[h!]
\centering
 \begin{tabular}{||c c c c||}
 \hline
 Col1 & Col2 & Col2 & Col3 \\ [0.5ex]
 \hline\hline
 1 & 6 & 87837 & 787 \\
 2 & 7 & 78 & 5415 \\
 3 & 545 & 778 & 7507 \\
 4 & 545 & 18744 & 7560 \\
 5 & 88 & 788 & 6344 \\ [1ex]
 \hline
 \end{tabular}
\end{table}h 大约出现在这里(here)。
t 出现在页面的顶部(top)。
b 出现在页面的底部(bottom)。
p 将表格放置在一个专门放置表格的特殊页面。
! 覆盖LaTeX内部的参数。
H 将表格精确地放置在其出现的位置,一般等价于h!。
\centering 这个命令使表格在容器中居中。
[1ex] 这个命令在行中的单元格内添加了额外的空间。
2.3.6 表题、标签、引用
**
\caption{Table to test captions and labels}**设定了表格的标题,可以将其放在表格的上方或者下方**
\label{table:1}**给表格设定一个标签**
\ref{table:1}**这个命令在文档中会变成表格的编号
2.3.7 创建表格列表
\documentclass{article}
\usepackage[utf8]{inputenc}

\begin{document}

\listoftables

...
\end{document}
3 高级教程
3.1 表格模板
3.1.1 不跨越多页的三线表模板
\begin{table}[h!]
\centering
\caption{Table to test captions and labels}
\begin{tabular}{c c c c}
 \hline\hline
 Col1 & Col2 & Col2 & Col3 \\ [0.5ex]
 \hline
 1 & 6 & 87837 & 787 \\
 2 & 7 & 78 & 5415 \\
 3 & 545 & 778 & 7507 \\
 4 & 545 & 18744 & 7560 \\
 5 & 88 & 788 & 6344 \\ [1ex]
 \hline\hline
\end{tabular}
\label{table:1}
\end{table}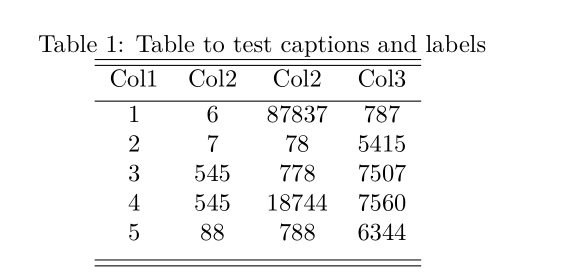
3.1.2 跨页三线表模板
 \begin{longtable}[c]{ c  c }
 \caption{Long table caption.\label{long}}\\
 \hline
 \hline
 Something & something else\\
 \hline
 \endhead
 \hline\hline
 \endlastfoot
 Lots of lines & like this\\
 Lots of lines & like this\\
 Lots of lines & like this\\
 Lots of lines & like this\\
 Lots of lines & like this\\
 Lots of lines & like this\\
 Lots of lines & like this\\
 Lots of lines & like this\\
 ...
 Lots of lines & like this\\
 \end{longtable}
 \label{table:2}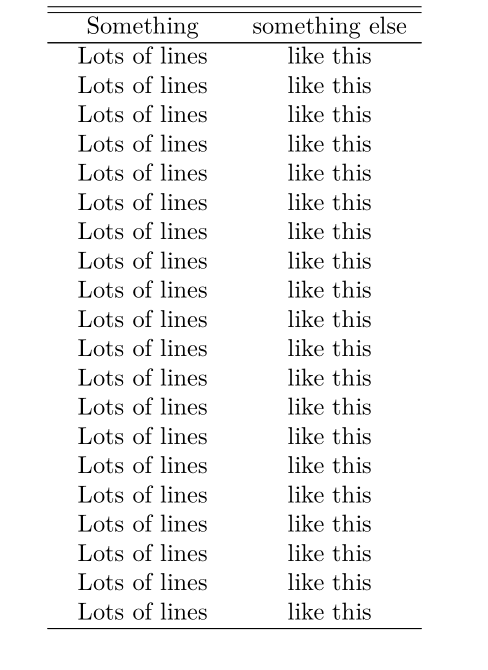
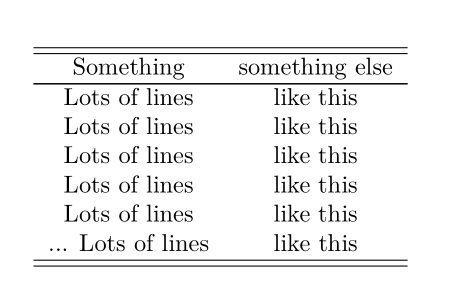
 \begin{longtable}[c]{ c  c }
 \caption{Long table caption.\label{long}}\\
 \hline
 \hline
 Something & something else\\
 \hline
 \endfirsthead
 \hline\hline
 Something & something else\\
 \hline
 \endhead

 \hline
 \endfoot

 \hline\hline
 \endlastfoot
 Lots of lines & like this\\
 Lots of lines & like this\\
 Lots of lines & like this\\
 Lots of lines & like this\\
 Lots of lines & like this\\
 Lots of lines & like this\\
 Lots of lines & like this\\
 Lots of lines & like this\\
 Lots of lines & like this\\
 Lots of lines & like this\\
 Lots of lines & like this\\
 Lots of lines & like this\\
 Lots of lines & like this\\
 Lots of lines & like this\\
 Lots of lines & like this\\
 Lots of lines & like this\\
 Lots of lines & like this\\
 Lots of lines & like this\\
 Lots of lines & like this\\
 Lots of lines & like this\\
 Lots of lines & like this\\
 Lots of lines & like this\\
 Lots of lines & like this\\
 Lots of lines & like this\\
 ...
 Lots of lines & like this\\
 \end{longtable}
\label{table:2}3.2 图片模板
\begin{figure}[ht]

    \centering
    \includegraphics[scale=0.6]{2.png}
    \caption{this is a figure demo}
    \label{fig:1}
    \end{figure}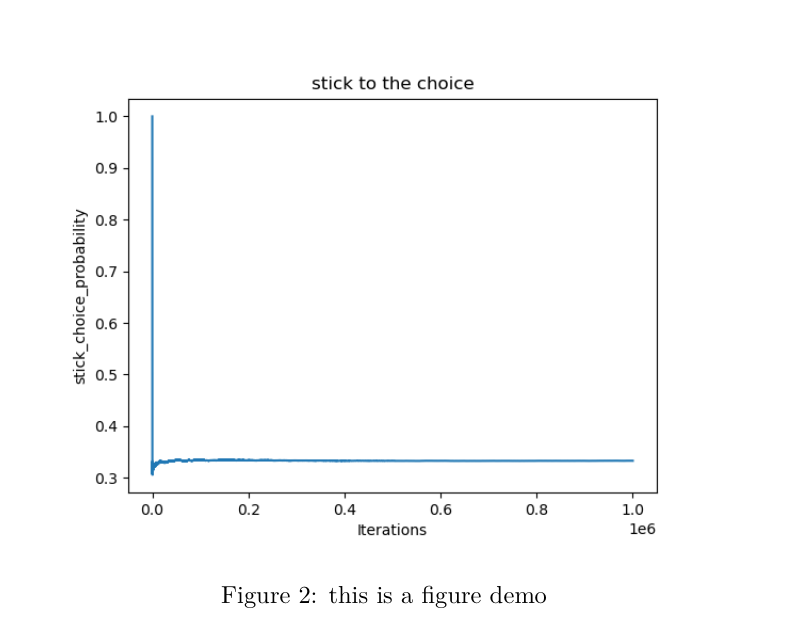
4 参考链接:
总体介绍:https://www.latexstudio.net/archives/9377.html
latex公式介绍:https://zhuanlan.zhihu.com/p/110756681
latex插入表格介绍:https://blog.csdn.net/xovee/article/details/109254872
latex插入图片介绍:https://blog.csdn.net/chichoxian/article/details/52588833
